Warning: Any breakage due to following this tutorial is sole responsibility of any body using this tutorial. So here is what I did to fix this. Physical fix took about 1 and a 1/2 hours from disassembly to cleaning out switch to VOM check to reassembly to reboot and check. Research took longer.
First. Do my research. Links below.
Link1
Link2
Link3
Then watch some videos. All credit goes to TigerOnEEEPC for making these videos on youtube.
The above videos were invaluable and I used them to follow how to disassemble my Netbook.
After pulling keyboard and upper plastic casing (plus ribbon harnesses for keyboard and mouse) I took apart the switch using this video for reference. Downloaded zip and extracted using Mplayer to watch extracted AVI File. Which was made with Open source tools like Blender. All credit goes to wapko for making this video.
Link
The contact disk was not cracked inside of switch. Cleaned out contacts with 90% denatured alcohol and q-tips and a razor knife (thin one). Reassembled switch. Checked with VOM first before reassembling Netbook.
Checked good with VOM. Reassembled Netbook.
Booted up into Antix 8.5. Left click on Menu in Icewm. Left click now works as it should. I will see how long this fix lasts.
Sunday, August 8, 2010


Thursday, April 22, 2010
AntiX 8.5 Full install on Asus EEEPC 900
Disclaimer: Do at your own risk.
All below procedures are done with the understanding that the user backs up all critical data. This site and author is not responsible for any mistakes or problems encountered. I will try to make this as simple and painless as possible. Any novice should be able to hopefully follow the below steps.
This time I am going to show how I installed the New AntiX 8.5 to my internal Solid State Drives.
4gig SSD and 16gig SSD, I had Xandros 4 on this Netbook previously. To read up on New Features and to download AntiX. You can go to Here
There are numerous ways to make a boot able Live USB. I used Unetbootin to make mine like I did in My Previous AntiX tutorial.
It was also pointed out you can make a live USB using the antiX2usb installer via the AntiX Control Center. Below link will show you how.
Link
If using Xandros to make Unetbootin work. All I can say is to make sure mtools and p7zip is installed in Xandros also.Otherwise the Linux Version of Unetbootin won't work (won't start).
There will be no swap partition made with this install. Swap partitions can be harmful for SSD drives.
Insert your bootable live USB of AntiX 8.5. Power up and hit Esc key and pick your pendrive as first boot device. When grub Menu comes up pick Netbook boot from the grub menu. Now from here on. These were my steps on how I installed AntiX 8.5 (my way).
After getting to a Desktop. I went to the taskbar with the crossed wrenches icon and opened up AntiX Control Center and left clicked on the Network Tab.
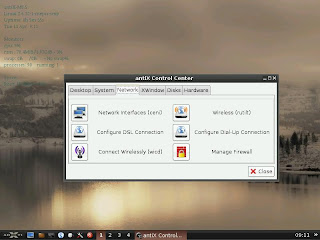
I have connected my Asus EEEPC 900 using Ceni also. Ceni picks up my wireless and Cable interface just fine as wlan0 and eth0. I just prefer wicd but Ceni will work for you also.
Ceni
I picked Connect Wirelessly with Wicd. On the next window that opens. I go to the preferences tab and left click it. In the empty Connect Wireless Box I type in wlan0.
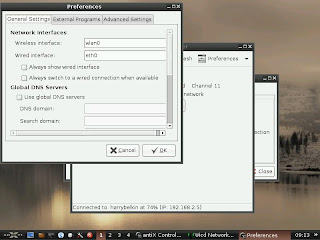
Then I left click on External Programs and switch from Automatic to dhclient. I then left click on the refresh tab and my router shows up and I connect via wireless to my router. A safer way to go about installing is if you have a land line. Use it instead if worried about dropping a connection. I just wanted to show I enabled wireless on my EEEPC 900.
Ok, Now on to the install. Left click on Menu Tab on far left of taskbar. Pick the AntiX Installer 3rd up on the Menu.
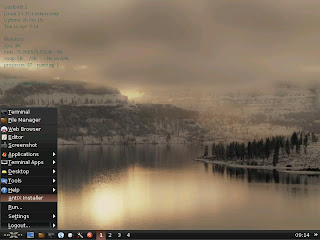
Left click and next window asks for password. The password is
When Next Window opens you tick on the box agree to terms
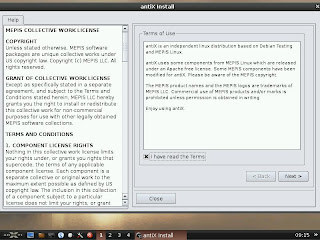
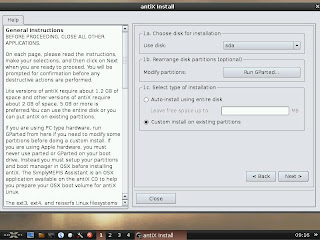
Next window make sure sda is showing. Tick on Install to custom partitions. Then Left click on Gparted Button.
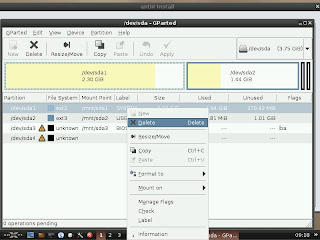
When parted Opens. You will see sda1, sda2, sda3, and sda4. DO NOT TOUCH sda3 OR sda4. The only partitions you wish to delete are sda1 and sda2.. So right click on sda1 and select delete. Do the same also for sda2. Below I show sda1.
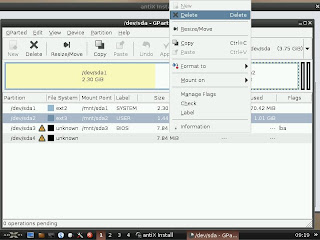
Below I show sda2
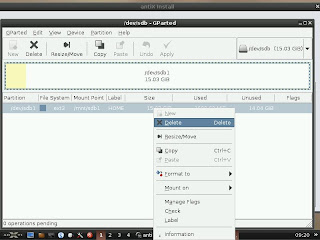
We will now move on to sdb drive which is the 16 gig secondary drive on my Asus EEEPC 900. I proceed to delete that partition also. In gparted in the top r/h corner hit the drop down arrow and select /dev/sdb. Then delete sdb like you did the 2 partitions on sda.
Ok. If you followed everything correctly so far your gparted window should look like mine below.
Check out that the assigned tasks you have given gparted (like delete sda1,sda2,and sdb) show in the bottom of gparted window.
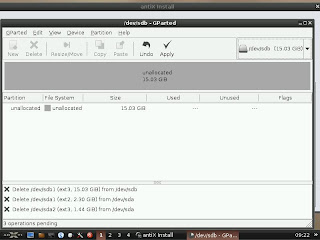
If everything looks good. Hit the apply button and let gparted do its job.You will be greeted by one last final warning. Say yes and you are off to starting on your AntiX install. Xandros will be no more. Not even the recovery you had when you used the F9 option on the Asus 900. This is a one way trip.
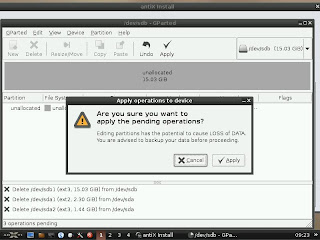
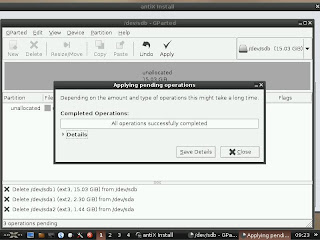
After you get the completed successful operations window. Hit the close button.
Now go back to the top r/h corner of gparted and select /dev/sda with the drop down arrow.
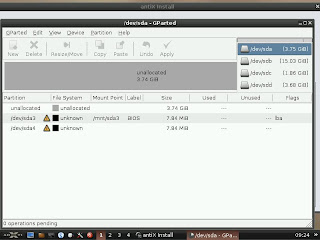
Left click on unallocated partition on sda and select new
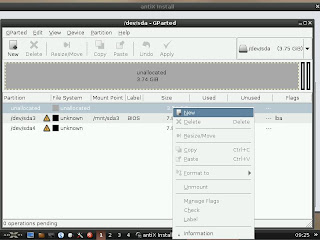
Make it a primary partition. I picked ext2 file system because I have read that journaling file systems like ext3,reiserfs, etc.... are harmful for SSD drives. Better safe than sorry says I.
Label it as root (/).
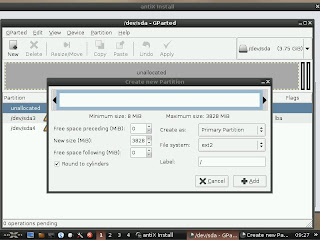
Now after setting that up. Go to the top r/h corner again and select /dev/sdb
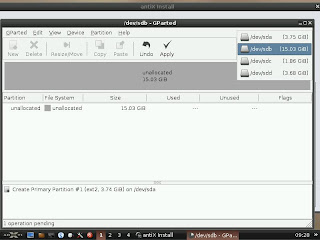
Again right click on the 16gig unallocated and select new
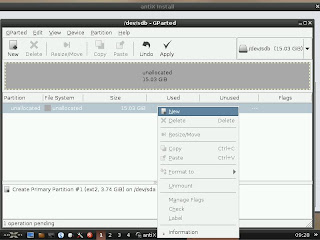
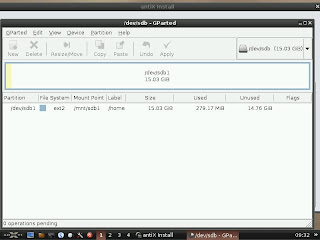
I made mine a primary partition, ext2 file system, labeled as /home.
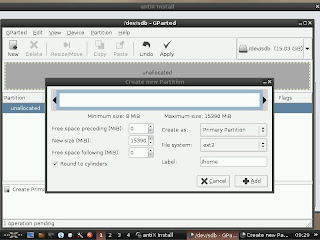
Again. Double check the bottom of gparted window before saying apply operations.
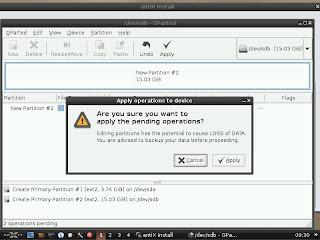
Below is the next window you should see after hitting apply button.
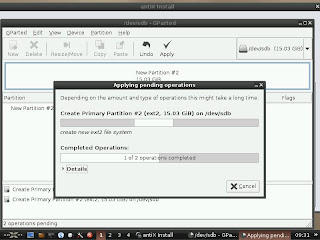
When done. Take a look at sdb and see if yours looks like mine.
Now go back to sda and we are going to flag sda as bootable. Just right click and select Manage flags. Then tick on the boot box and hit apply.
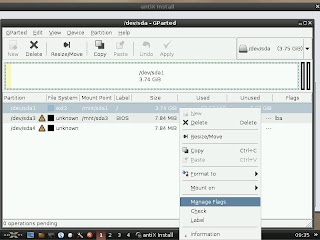
After hitting apply your line for /dev/sda1 should look like mine.
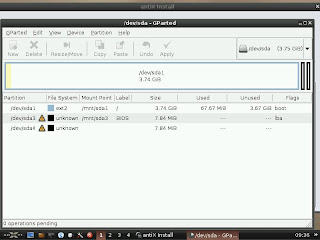
Ok. You can close gparted now. You are done setting up your SSD drives for the installation process.
Now. To avoid some confusion. The Mepis Installer that AntiX 8.5 uses can not install /home to the secondary 16gig drive you formatted. It is a limitation because IMO the installer was made for platter ide and sata drives which are usually only one drive per laptop. I will show you later on how I moved the home folder to sdb 16gig SSD in as simple of procedures as I know how.
I have successfully done this procedure and am writing this tutorial on my Asus EEEPC 900 and all things I save to home now go on to my /home drive on sdb.
Now. Make sure sda1 is where the root partition is going. No swap. And home is also going to root for now. Make sure and tick on the box that says "preserve data in /home (if upgrading) so as to not overwrite your ext2 partition. If you don't click that box. /home will be formatted as ext3 during the install process. So to preserve my ext2 file system. I tick on that box also.
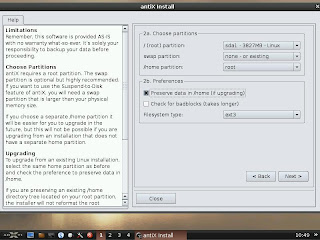
Select yes on the last minstall that pops up. You are ready to install AntiX 8.5 now.
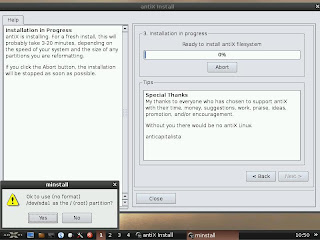
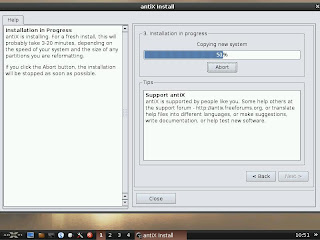
The install process is fast. This is your next window. I read the messages while installing.
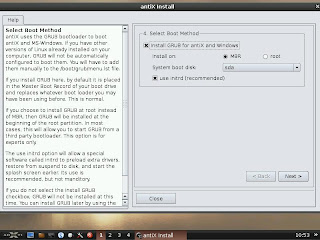
When done. We are on to installing grub. Make yours match my screenshot below for installing grub
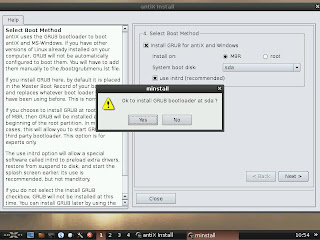
You will be asked if it is ok.Say Yes.
Confirmation grub installed OK is Next.
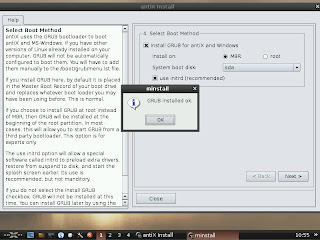
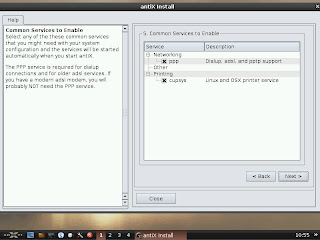
After hitting OK. The next window is for startup services in case you need dial up or printing services. I just leave the defaults for me and select next.
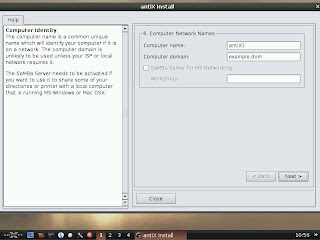
Next window is network names
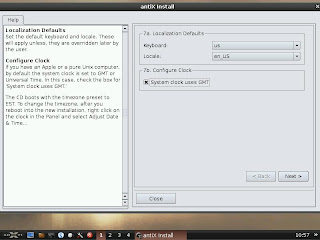
Next is localization Window. I am a Texan so I pick English. I ticked the GMT box (personal preference).
Next is user name and passwords.
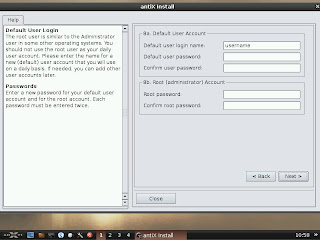
Don't freak out if you get a warning pop up saying something about not being able to name user folder. I got that pop up. Just say OK and hit finish when you are done.
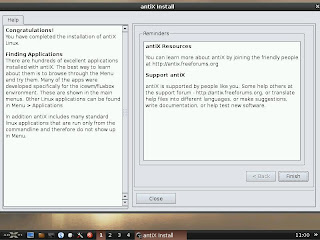
Next Window. You are done for now. Reboot and pull your live Pendrive when netbook shuts down. You are done with it.
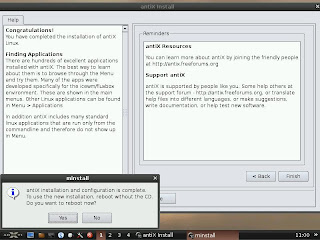
Reboot to your new AntiX install. Just pick the top option in grubs menu. Slim is the login manager for AntiX. The Splash screen is by my good buddy Sakasa. If you wish to have wicd monitor show up on taskbar so as to see if you are connected. What I did was go to the crossed wrenches in toolbar and when AntiX control Center Opens I selected "Edit Icewm Settings and below window opens. I select startup tab on taskbar and uncomment the
"sleep 2 && wicd-client &" . Hit save on taskbar and exit.
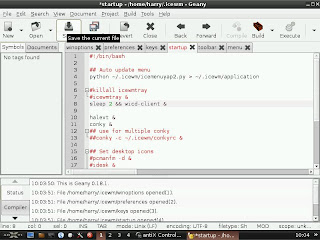
Next hit the red button on taskbar and log out and back in again. You should have a moniter on bottom r/h of taskbar

Now. The easiest way I know how to show you how I moved my home folder in / to /home on sdb is to provide a link to the thread I made at AntiX Forums. Thanks to SilverBear, dolphin_oracle,secipolla, and anticapitalista. I was successful in moving home on / of sda to
/home on sdb,
Link
Any questions you may have or comments. You can make at the AntiX section at Mepis Lovers or the AntiX Forum.
I am going to just provide some screenshots below to show how my edited /etc/fstab looks now. Always back up your /etc/fstab or any other file that you are going to make changes to
I do this by making a backup folder in home and inserting stock unchanged files in there and renaming them fstabbackup as a example.
First shot shows how rox should appear after moving home to /home to sdb and symlinking /home on sdb to / on sda. The symlink is needed to move saved changes to the new home on sdb. My thread should pretty well explain how I went about doing this and has screenshots. If you get stuck. Ask and someone will answer in the AntiX forum or at Mepis Lovers.
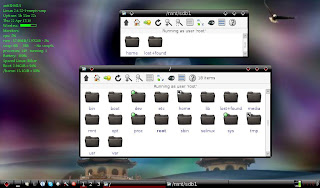
My current /etc/fstab as it now stands. Also after moving home to /home on sdb. Make sure home has file permissions so as user can make changes. I did this by opening a terminal. Typed in
entered my password and pcmanfm opened as root user. Then went to my /home drive and right clicked on home folder and selected properties. Then selected permissions and made my user able to read and write to folder and all sub directories. My Modified /etc/fstab below
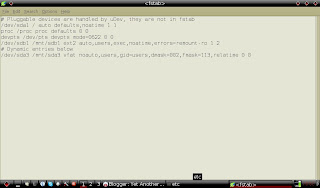
Update: Limiting writes to SSD on EEEPC. I made this thread at AntiX Forum and another at Mepis Lovers. If interested
Link
There might be better ways to write and do this kind of install and tutorial. But I am just a regular Home User trying to help out the Linux community for all the help given me. Happy Trails, Rok
All below procedures are done with the understanding that the user backs up all critical data. This site and author is not responsible for any mistakes or problems encountered. I will try to make this as simple and painless as possible. Any novice should be able to hopefully follow the below steps.
This time I am going to show how I installed the New AntiX 8.5 to my internal Solid State Drives.
4gig SSD and 16gig SSD, I had Xandros 4 on this Netbook previously. To read up on New Features and to download AntiX. You can go to Here
There are numerous ways to make a boot able Live USB. I used Unetbootin to make mine like I did in My Previous AntiX tutorial.
It was also pointed out you can make a live USB using the antiX2usb installer via the AntiX Control Center. Below link will show you how.
Link
If using Xandros to make Unetbootin work. All I can say is to make sure mtools and p7zip is installed in Xandros also.Otherwise the Linux Version of Unetbootin won't work (won't start).
There will be no swap partition made with this install. Swap partitions can be harmful for SSD drives.
Insert your bootable live USB of AntiX 8.5. Power up and hit Esc key and pick your pendrive as first boot device. When grub Menu comes up pick Netbook boot from the grub menu. Now from here on. These were my steps on how I installed AntiX 8.5 (my way).
After getting to a Desktop. I went to the taskbar with the crossed wrenches icon and opened up AntiX Control Center and left clicked on the Network Tab.

I have connected my Asus EEEPC 900 using Ceni also. Ceni picks up my wireless and Cable interface just fine as wlan0 and eth0. I just prefer wicd but Ceni will work for you also.
Ceni
I picked Connect Wirelessly with Wicd. On the next window that opens. I go to the preferences tab and left click it. In the empty Connect Wireless Box I type in wlan0.

Then I left click on External Programs and switch from Automatic to dhclient. I then left click on the refresh tab and my router shows up and I connect via wireless to my router. A safer way to go about installing is if you have a land line. Use it instead if worried about dropping a connection. I just wanted to show I enabled wireless on my EEEPC 900.
Ok, Now on to the install. Left click on Menu Tab on far left of taskbar. Pick the AntiX Installer 3rd up on the Menu.

Left click and next window asks for password. The password is
root
When Next Window opens you tick on the box agree to terms

Next window make sure sda is showing. Tick on Install to custom partitions. Then Left click on Gparted Button.

When parted Opens. You will see sda1, sda2, sda3, and sda4. DO NOT TOUCH sda3 OR sda4. The only partitions you wish to delete are sda1 and sda2.. So right click on sda1 and select delete. Do the same also for sda2. Below I show sda1.

Below I show sda2

We will now move on to sdb drive which is the 16 gig secondary drive on my Asus EEEPC 900. I proceed to delete that partition also. In gparted in the top r/h corner hit the drop down arrow and select /dev/sdb. Then delete sdb like you did the 2 partitions on sda.

Ok. If you followed everything correctly so far your gparted window should look like mine below.
Check out that the assigned tasks you have given gparted (like delete sda1,sda2,and sdb) show in the bottom of gparted window.

If everything looks good. Hit the apply button and let gparted do its job.You will be greeted by one last final warning. Say yes and you are off to starting on your AntiX install. Xandros will be no more. Not even the recovery you had when you used the F9 option on the Asus 900. This is a one way trip.

After you get the completed successful operations window. Hit the close button.

Now go back to the top r/h corner of gparted and select /dev/sda with the drop down arrow.

Left click on unallocated partition on sda and select new
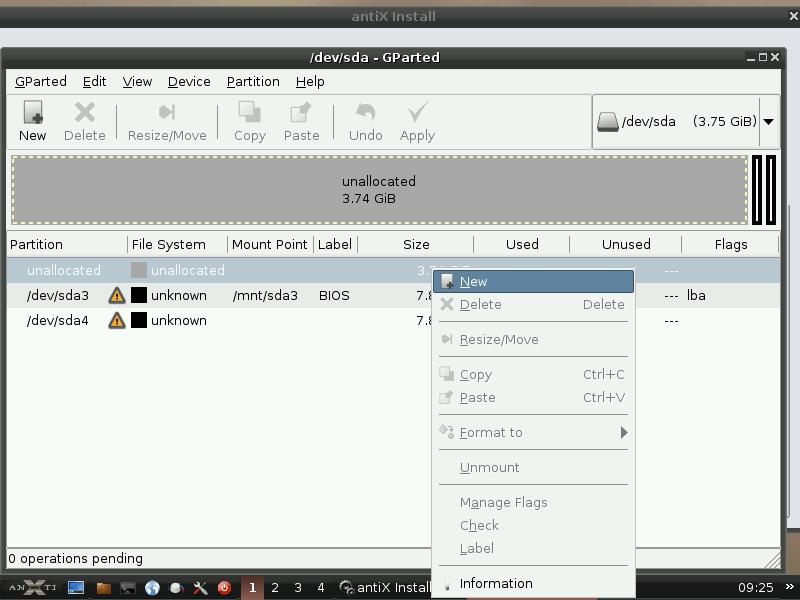
Make it a primary partition. I picked ext2 file system because I have read that journaling file systems like ext3,reiserfs, etc.... are harmful for SSD drives. Better safe than sorry says I.
Label it as root (/).

Now after setting that up. Go to the top r/h corner again and select /dev/sdb

Again right click on the 16gig unallocated and select new

I made mine a primary partition, ext2 file system, labeled as /home.

Again. Double check the bottom of gparted window before saying apply operations.

Below is the next window you should see after hitting apply button.

When done. Take a look at sdb and see if yours looks like mine.

Now go back to sda and we are going to flag sda as bootable. Just right click and select Manage flags. Then tick on the boot box and hit apply.

After hitting apply your line for /dev/sda1 should look like mine.

Ok. You can close gparted now. You are done setting up your SSD drives for the installation process.
Now. To avoid some confusion. The Mepis Installer that AntiX 8.5 uses can not install /home to the secondary 16gig drive you formatted. It is a limitation because IMO the installer was made for platter ide and sata drives which are usually only one drive per laptop. I will show you later on how I moved the home folder to sdb 16gig SSD in as simple of procedures as I know how.
I have successfully done this procedure and am writing this tutorial on my Asus EEEPC 900 and all things I save to home now go on to my /home drive on sdb.
Now. Make sure sda1 is where the root partition is going. No swap. And home is also going to root for now. Make sure and tick on the box that says "preserve data in /home (if upgrading) so as to not overwrite your ext2 partition. If you don't click that box. /home will be formatted as ext3 during the install process. So to preserve my ext2 file system. I tick on that box also.

Select yes on the last minstall that pops up. You are ready to install AntiX 8.5 now.

The install process is fast. This is your next window. I read the messages while installing.

When done. We are on to installing grub. Make yours match my screenshot below for installing grub

You will be asked if it is ok.Say Yes.

Confirmation grub installed OK is Next.

After hitting OK. The next window is for startup services in case you need dial up or printing services. I just leave the defaults for me and select next.

Next window is network names

Next is localization Window. I am a Texan so I pick English. I ticked the GMT box (personal preference).

Next is user name and passwords.

Don't freak out if you get a warning pop up saying something about not being able to name user folder. I got that pop up. Just say OK and hit finish when you are done.

Next Window. You are done for now. Reboot and pull your live Pendrive when netbook shuts down. You are done with it.

Reboot to your new AntiX install. Just pick the top option in grubs menu. Slim is the login manager for AntiX. The Splash screen is by my good buddy Sakasa. If you wish to have wicd monitor show up on taskbar so as to see if you are connected. What I did was go to the crossed wrenches in toolbar and when AntiX control Center Opens I selected "Edit Icewm Settings and below window opens. I select startup tab on taskbar and uncomment the
"sleep 2 && wicd-client &" . Hit save on taskbar and exit.

Next hit the red button on taskbar and log out and back in again. You should have a moniter on bottom r/h of taskbar

Now. The easiest way I know how to show you how I moved my home folder in / to /home on sdb is to provide a link to the thread I made at AntiX Forums. Thanks to SilverBear, dolphin_oracle,secipolla, and anticapitalista. I was successful in moving home on / of sda to
/home on sdb,
Link
Any questions you may have or comments. You can make at the AntiX section at Mepis Lovers or the AntiX Forum.
I am going to just provide some screenshots below to show how my edited /etc/fstab looks now. Always back up your /etc/fstab or any other file that you are going to make changes to
I do this by making a backup folder in home and inserting stock unchanged files in there and renaming them fstabbackup as a example.
First shot shows how rox should appear after moving home to /home to sdb and symlinking /home on sdb to / on sda. The symlink is needed to move saved changes to the new home on sdb. My thread should pretty well explain how I went about doing this and has screenshots. If you get stuck. Ask and someone will answer in the AntiX forum or at Mepis Lovers.

My current /etc/fstab as it now stands. Also after moving home to /home on sdb. Make sure home has file permissions so as user can make changes. I did this by opening a terminal. Typed in
gksu pcmanfm
entered my password and pcmanfm opened as root user. Then went to my /home drive and right clicked on home folder and selected properties. Then selected permissions and made my user able to read and write to folder and all sub directories. My Modified /etc/fstab below

Update: Limiting writes to SSD on EEEPC. I made this thread at AntiX Forum and another at Mepis Lovers. If interested
Link
There might be better ways to write and do this kind of install and tutorial. But I am just a regular Home User trying to help out the Linux community for all the help given me. Happy Trails, Rok
Friday, April 9, 2010
INXI Yes you can install it in Ubuntu
I showed you how it could be installed in Puppy Linux.
So I decided. Lets see if this works in ubuntu. So I booted up my Ubuntu 8.04 LTS Desktop. And proceeded to install.
First I went back to the site
Then proceeded to install page
I used the below command to download the deb package to my /home folder

So I issue the command to download
Wait till it downloads my deb package to /home. I go to places on my taskbar and select home to open. I look and find my inxi_1.3.2-1_all.deb.
Now it is just double left click on inxi_1.3.2-1_all.deb and let Gdebi do its thing.
After installing. Open Terminal and upgrade inxi first by doing a
After it upgrades to inxi 1.4.8 you can run inxi -F to look at your system specs.

I like having extra commands in terminal that I never had before. It makes my box more functional. Happy Trails, Rok
So I decided. Lets see if this works in ubuntu. So I booted up my Ubuntu 8.04 LTS Desktop. And proceeded to install.
First I went back to the site
Then proceeded to install page
I used the below command to download the deb package to my /home folder

So I issue the command to download
sudo wget ftp://cathbard.com/binary/inxi*.deb
Wait till it downloads my deb package to /home. I go to places on my taskbar and select home to open. I look and find my inxi_1.3.2-1_all.deb.
Now it is just double left click on inxi_1.3.2-1_all.deb and let Gdebi do its thing.
After installing. Open Terminal and upgrade inxi first by doing a
sudo inxi -U
After it upgrades to inxi 1.4.8 you can run inxi -F to look at your system specs.

I like having extra commands in terminal that I never had before. It makes my box more functional. Happy Trails, Rok
Wednesday, March 31, 2010
Songbird add-on to use Ubuntu notifications
In a previous post, we saw 3 add-ons for Firefox and Thunderbird that allowed them to use Ubuntu or KDE notification system, so they would integrate much better with the OS. There is a similar add-on available for the geat media player Songbird too!
It can display title/artist/album name/genre/rating (any metadata actually and in any order you like) and the album cover!
You can find ubuntu-notifyOSD here.

Rant: Why Songbird is still not in the Ubuntu/Debian repositories (PPA is not a good solution, it should be in the real repositories) is beyond my comprehension and probably beyond any (un)reasonable explanation. It can't be that hard for the Ubuntu, Debian & Songbird developers to package it, can it???
Rant update!!!!!
As if absence form repositories was not enough, Songbird team announced that they are droping official support for Linux!!!!! Community builds will keep coming for anyone who still cares to use it. Maybe Songbird on Linux was doomed from the beginning with most KDE distros shipping with Amarok and Ubuntu and many others with Rythmbox. But this is a really lame excuse, as many other programs thrive, despite not being the default ones. The biggest reason for its failure was not ever really trying to provide packages for the most popular distributions and using the system theme to integrate better with the OS.
So, as my favorite Southpark character Cartman would say:
Where "home" would be the preinstalled Rythmbox.
It can display title/artist/album name/genre/rating (any metadata actually and in any order you like) and the album cover!
You can find ubuntu-notifyOSD here.

Rant: Why Songbird is still not in the Ubuntu/Debian repositories (PPA is not a good solution, it should be in the real repositories) is beyond my comprehension and probably beyond any (un)reasonable explanation. It can't be that hard for the Ubuntu, Debian & Songbird developers to package it, can it???
Rant update!!!!!
As if absence form repositories was not enough, Songbird team announced that they are droping official support for Linux!!!!! Community builds will keep coming for anyone who still cares to use it. Maybe Songbird on Linux was doomed from the beginning with most KDE distros shipping with Amarok and Ubuntu and many others with Rythmbox. But this is a really lame excuse, as many other programs thrive, despite not being the default ones. The biggest reason for its failure was not ever really trying to provide packages for the most popular distributions and using the system theme to integrate better with the OS.
So, as my favorite Southpark character Cartman would say:
Where "home" would be the preinstalled Rythmbox.
Monday, March 29, 2010
AntiX 8.5 Persistent Flash Drive.
This how to is just going to be a generic how to for making a persistent live usb of AntiX. You can do this on any computer. You can do this with a Live CD or Live USB or Live SD. For my purposes. I am doing this using a live USB. But a Live cd will work just as good for this also. Your downloaded iso I will show you later will work running in live cd mode also. So it does not matter if you are using a Live CD or Live USB or SD card. My persistent live drive I am going to install to is going to be a Kingston 4gig SD Flash card.
You should know. That any changes you make to a persistent install usb. Like if you install xfce Desktop of KDE Desktop or Gnome Desktop to your live persistent USB Drive. If you run the installer on that USB Persistent Drive. It will install ALL Changes like your XFCE,GNOME,or KDE Desktop also.
The Meta installer which is on the menu is a great tool for installing different Desktops and other stuff.
I am going to show how doing this with the AntiX 8.5 base ISO. For first time users I would suggest you download the AntiX 8.5 Full Iso.
I will mention this though. If you are a EEEPC user reading this. If you do the base Install and Ceni when you open it runs the cpu at 100% when loading Ceni. Just wait till Ceni finishes loading and CPU will drop back down to 15%. I experienced this on my EEEPC 900 (celeron processor). I also used a land line for all my downloads and after booting up base Persist SD Card. I used a land line also running base to install packages using
In terminal as root user and then
So as to bypass using ceni to connect wireless. Do what you wish though. I am just mentioning this from personal experience.
Just think of AntiX base as a Debian Net minimal install that you can build off of.
AntiX Full Iso has more tools though Like AntiX control center and Synaptic package manager. The base just comes with apt-get. Full Iso comes with ceni, wicd, rutilt to connect to the net. Base come with just ceni.
Antix has a New Wiki thanks to all the hard work by the Antix group. Check it out also.
Antix Wiki How To articles
You will need to make a Live Media of AntiX 8.5 first (cd or usb or SD card). Whichever way you prefer. My way is just one of the many ways it can be done.
Refer to my old post on AntiX 8.2 and Unetbootin if you wish to make a live USB my way.
Link
Inset your media that you wish to boot live session from. Insert at least a 1 gig Flash drive (what I would call a minimum size USB for a persistent USB of AntiX. 2 gig or higher would be better.)
Ok. Now use whatever key you need to use to change boot order in bios. And change boot first to USB or cdrom. Depends on what your bios is capable of and what media drive you are going to use.
You should be greeted with with a grub splash screen. Pick the top Option. You will not need to login. You should be greeted with a Icewm Desktop. Make sure you are connected to the net. We will need to download a ISO and Md5sum text from the net. Open your Browser and go to AntiX main web page. I used This Mirror since I live in the US. Choose any mirror you wish from the list though. Remember You can use any of the isos on that list. 8.2 Full, 8.2 base, 8.5 Full, Etc.... Any AntiX iso will work with the antix2usb persistent installer.
{I wonder if any other Linux Distro like Full Mepis 8.5 will work with the persistent installer. Time and testers will Tell)
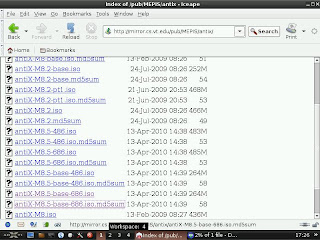
You can download isos to your live USB session. Just remember that if you reboot or shutdown. You will lose any isos downloaded after reboot. Download will take a few minutes. You have time to do other things while this is going on.
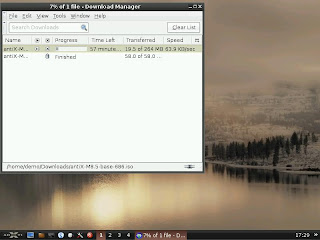
You should now have 2 files in your Download folder in AntiX. Now I am going to do a md5sum check of my Iso to make sure the file is OK. You should always do a md5sum check of large files (IMO) to save your self time and grief later if something does not go right.
Go to where you downloaded AntiX ISO and Md5sum. On mine I have it in /home/demo/downloads.
Right click on empty space in file manager. You should see a menu. Pick open in terminal. I am using pcmanfm file manager to show this. It is the default file manager in AntiX live though rox is available also. For simplicities sake. I will show this using the default file manager.
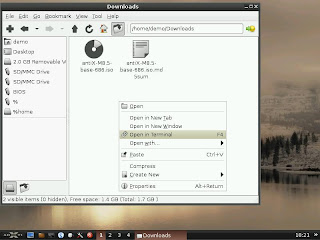
Next you will get a pop up. Terminal program not set. No worries. Just hit the oK button.
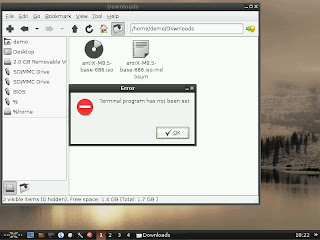
Next the preferences window will pop up and you can select which terminal you wish to run in file manager. For my purposes. I will pick rox-terminal. Just use the drop down arrow on the blank box in preferences to do this.
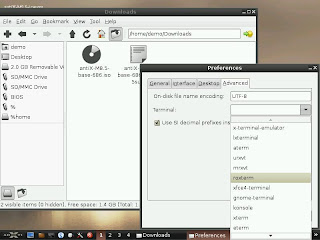
Close preferences window after selecting your preferred terminal. Right click on empty space where you have your isos and your terminal should now open. I used rox-terminal as a example so I could show you how to copy and paste md5sum readout into your downloaded md5sum text file to compare the two.
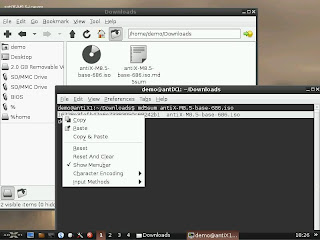
Double left click on your md5sum text file next to your iso file and paste terminal readout under your entry in text file.
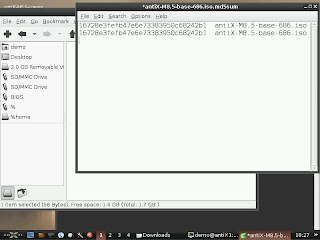
As you can see. My md5sum check OK. So I can close pcmanfm because I am done and start on the SD card Install process. A USB drive will work just as well.
Go to the crossed wrenches on the bottom task bar and open up AntiX control Center and left click on the disks tab. You will see antix2usb button on the bottom right of window.
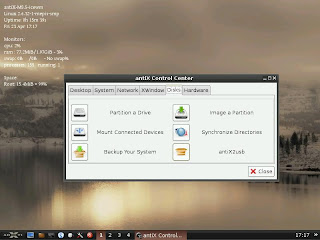
Left click on the antix2usb button and the next window that pops up will show the installer. On the top Select Iso file find your downloaded Iso and put it in that window.
On device find your drive you are going to do the persist install to and put it in that window.
Make sure the drive you are installing persistence to is unmounted. You can unmount it by either opening pcmanfm as root.
or follow steps using steps from the wiki
It was just easier for me to unmount SD drive using pcmanfm as root user. There are many ways to unmount a drive in AntiX. My way is just one way to do it.
Mine looks like this screenshot when done.
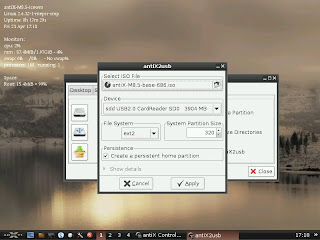
I am using ext2 file system. I am also using the default 320mb since I am using Base Iso for this tutorial. If using Full Iso the value will be a little larger. Closer to 600 mb or so. The default sets the demo (live Partition) 10% higher than it needs to be. So default is fine in most cases. If your drive is huge like 8gig or so. You can type in that box a larger value if you so wish. Just remember you are going to be taking away space from the persistent partition when you do this. If you hit the drop down arrow. Other file systems are available like ext3 and ext4. Use what you wish. Notice that I have the persistence box checked also. Everything from here on will be done Auto Magically. Hit the Apply Button.
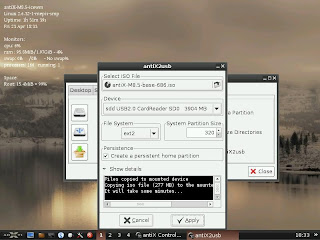
Be patient. Give it some time. If you get a pop up window saying the install drive is mounted. Then you haven't unmounted the drive yet. Just unmount that drive and hit the apply button again after closing error window.
Window below should show up if you did every thing right.
Just Shut down and pull your Live CD, Or USB. Keep the persistent live in your computer. Use bios to boot from that drive. Enjoy your new Persistent Live media on your computer. My persistent flash drive using fluxbox (default window manager for base) with rox desktop icons (with a couple of new apps installed)
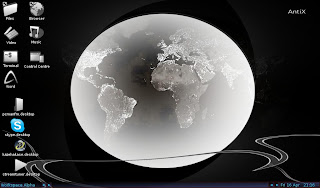
Thanks again to the gang at AntiX. Just to mention a few. (Not in order of importance. Just great guys involved in this). Special thanks to lagopus for this useful tool.
lagopus
miks
m_pav
anticapitalista
BitJam
secipolla
ICE-M
eriefisher
SilverBear
OldHogsHead
And a ton of others.It is a community of Linux brothers.
Sorry if I missed anybody. You should really check out the Antix2usb installer. It is one neat tool to have. I am going to leave this last link just because I like it. It mentions the 2 operating systems I chose to run on some of my gear.
Best NewLinux Operating Systems you may not know about for 2010
Since doing this install. I have installed XFCE Desktop and wicd network manager. I use this drive on My Acer Aspire One ZG5 with Atheros Wireless Chipset with the Ath5K Linux driver that comes stock in AntiXs kernel. wlan1 is the wicd network manager interface to get connected in wicd properties. I use dhclient also instead of Automatic in wicd preferences also.
You should know. That any changes you make to a persistent install usb. Like if you install xfce Desktop of KDE Desktop or Gnome Desktop to your live persistent USB Drive. If you run the installer on that USB Persistent Drive. It will install ALL Changes like your XFCE,GNOME,or KDE Desktop also.
The Meta installer which is on the menu is a great tool for installing different Desktops and other stuff.
I am going to show how doing this with the AntiX 8.5 base ISO. For first time users I would suggest you download the AntiX 8.5 Full Iso.
I will mention this though. If you are a EEEPC user reading this. If you do the base Install and Ceni when you open it runs the cpu at 100% when loading Ceni. Just wait till Ceni finishes loading and CPU will drop back down to 15%. I experienced this on my EEEPC 900 (celeron processor). I also used a land line for all my downloads and after booting up base Persist SD Card. I used a land line also running base to install packages using
apt-get update
In terminal as root user and then
apt-get install wicd
So as to bypass using ceni to connect wireless. Do what you wish though. I am just mentioning this from personal experience.
Just think of AntiX base as a Debian Net minimal install that you can build off of.
AntiX Full Iso has more tools though Like AntiX control center and Synaptic package manager. The base just comes with apt-get. Full Iso comes with ceni, wicd, rutilt to connect to the net. Base come with just ceni.
Antix has a New Wiki thanks to all the hard work by the Antix group. Check it out also.
Antix Wiki How To articles
You will need to make a Live Media of AntiX 8.5 first (cd or usb or SD card). Whichever way you prefer. My way is just one of the many ways it can be done.
Refer to my old post on AntiX 8.2 and Unetbootin if you wish to make a live USB my way.
Link
Inset your media that you wish to boot live session from. Insert at least a 1 gig Flash drive (what I would call a minimum size USB for a persistent USB of AntiX. 2 gig or higher would be better.)
Ok. Now use whatever key you need to use to change boot order in bios. And change boot first to USB or cdrom. Depends on what your bios is capable of and what media drive you are going to use.
You should be greeted with with a grub splash screen. Pick the top Option. You will not need to login. You should be greeted with a Icewm Desktop. Make sure you are connected to the net. We will need to download a ISO and Md5sum text from the net. Open your Browser and go to AntiX main web page. I used This Mirror since I live in the US. Choose any mirror you wish from the list though. Remember You can use any of the isos on that list. 8.2 Full, 8.2 base, 8.5 Full, Etc.... Any AntiX iso will work with the antix2usb persistent installer.
{I wonder if any other Linux Distro like Full Mepis 8.5 will work with the persistent installer. Time and testers will Tell)

You can download isos to your live USB session. Just remember that if you reboot or shutdown. You will lose any isos downloaded after reboot. Download will take a few minutes. You have time to do other things while this is going on.

You should now have 2 files in your Download folder in AntiX. Now I am going to do a md5sum check of my Iso to make sure the file is OK. You should always do a md5sum check of large files (IMO) to save your self time and grief later if something does not go right.
Go to where you downloaded AntiX ISO and Md5sum. On mine I have it in /home/demo/downloads.
Right click on empty space in file manager. You should see a menu. Pick open in terminal. I am using pcmanfm file manager to show this. It is the default file manager in AntiX live though rox is available also. For simplicities sake. I will show this using the default file manager.

Next you will get a pop up. Terminal program not set. No worries. Just hit the oK button.

Next the preferences window will pop up and you can select which terminal you wish to run in file manager. For my purposes. I will pick rox-terminal. Just use the drop down arrow on the blank box in preferences to do this.

Close preferences window after selecting your preferred terminal. Right click on empty space where you have your isos and your terminal should now open. I used rox-terminal as a example so I could show you how to copy and paste md5sum readout into your downloaded md5sum text file to compare the two.

Double left click on your md5sum text file next to your iso file and paste terminal readout under your entry in text file.

As you can see. My md5sum check OK. So I can close pcmanfm because I am done and start on the SD card Install process. A USB drive will work just as well.
Go to the crossed wrenches on the bottom task bar and open up AntiX control Center and left click on the disks tab. You will see antix2usb button on the bottom right of window.

Left click on the antix2usb button and the next window that pops up will show the installer. On the top Select Iso file find your downloaded Iso and put it in that window.
On device find your drive you are going to do the persist install to and put it in that window.
Make sure the drive you are installing persistence to is unmounted. You can unmount it by either opening pcmanfm as root.
gksu pcmanfm
or follow steps using steps from the wiki
You can use the livecd/liveusb/fromiso live (as well as installed antiX) to install an antiX.iso file to usb stick via the antix2usb application.
1. Boot from live media
2. Open antiXcc -> Disks -> antix2usb, provide root password
3. Select Iso file - Navigate to the antiX.iso file
4. Choose a system partition size of circa 10 MB bigger than the selected Iso file
5. Set options for antix2usb ie persistent.
6. Make sure hal is disabled before hitting Apply (/etc/init.d/hal stop)
7. Once finished, you should have a bootable live usb stick with persistence enabled
8. If you have an older computer, you might need to add this to the /boot/grub/menu.lst to stop being dropped to a limited shell, when booting from the usb stick.
rootdelay=10
It was just easier for me to unmount SD drive using pcmanfm as root user. There are many ways to unmount a drive in AntiX. My way is just one way to do it.
Mine looks like this screenshot when done.

I am using ext2 file system. I am also using the default 320mb since I am using Base Iso for this tutorial. If using Full Iso the value will be a little larger. Closer to 600 mb or so. The default sets the demo (live Partition) 10% higher than it needs to be. So default is fine in most cases. If your drive is huge like 8gig or so. You can type in that box a larger value if you so wish. Just remember you are going to be taking away space from the persistent partition when you do this. If you hit the drop down arrow. Other file systems are available like ext3 and ext4. Use what you wish. Notice that I have the persistence box checked also. Everything from here on will be done Auto Magically. Hit the Apply Button.

Be patient. Give it some time. If you get a pop up window saying the install drive is mounted. Then you haven't unmounted the drive yet. Just unmount that drive and hit the apply button again after closing error window.
Window below should show up if you did every thing right.
Just Shut down and pull your Live CD, Or USB. Keep the persistent live in your computer. Use bios to boot from that drive. Enjoy your new Persistent Live media on your computer. My persistent flash drive using fluxbox (default window manager for base) with rox desktop icons (with a couple of new apps installed)

Thanks again to the gang at AntiX. Just to mention a few. (Not in order of importance. Just great guys involved in this). Special thanks to lagopus for this useful tool.
lagopus
miks
m_pav
anticapitalista
BitJam
secipolla
ICE-M
eriefisher
SilverBear
OldHogsHead
And a ton of others.It is a community of Linux brothers.
Sorry if I missed anybody. You should really check out the Antix2usb installer. It is one neat tool to have. I am going to leave this last link just because I like it. It mentions the 2 operating systems I chose to run on some of my gear.
Best NewLinux Operating Systems you may not know about for 2010
Since doing this install. I have installed XFCE Desktop and wicd network manager. I use this drive on My Acer Aspire One ZG5 with Atheros Wireless Chipset with the Ath5K Linux driver that comes stock in AntiXs kernel. wlan1 is the wicd network manager interface to get connected in wicd properties. I use dhclient also instead of Automatic in wicd preferences also.
Subscribe to:
Posts (Atom)
