Showing posts with label netbooks. Show all posts

Tuesday, September 22, 2009

Asus EEEPC 701 and 900 Anshul's Theme Manager = ATM

I can only report that this theme manger works great in Asus EEE PC 701 and 900 Xandros EASY DESKTOP Netbooks. Because this is Soooooo Neeeeew that these are the only 2 Netbooks so far that this script has been tested on. Anybody with a Asus Xandros Easy Desktop should try this script out. I run it on my Xandros Easy Desktop and it is the bomb In my opinion. Gives you a way to change wallpapers and themes and icons and also give a bouncy icon Mac look via a GUI interface. Simple to use also.

Here is what the author (a really good guy) of this script has to tell you about this

ATM-the theme manager for my eeepc
For my eeepc vanity needs i used to use theemer a wonderfully designed application with great gui.However,of late,i have not been using theemer as there is a bug in it on using gradient based images for the tabs in AsusLauncher the text on the tabs disappear which seems to be due to resizing of images in theeemer.I like changing my desktop look often and since i was unable to get theemer to work the way i wanted it to , I decided to make my own little script with gui using gtkdialog .


More Here

If you use his script to change your wallpapers or whatever in Easy Desktop on your Asus EEE PC Netbook. Please take the time to thank him and let him know you appreciate his hard work. If running something other than a 701 or 900 Asus EEE Let him know it works on your model or what doesn't work so he can incorporate it. He did that for me on my 900 when I tested his script. He is a very nice guy in my opinion also. I love my customized Xandros Easy Mode Desktop.


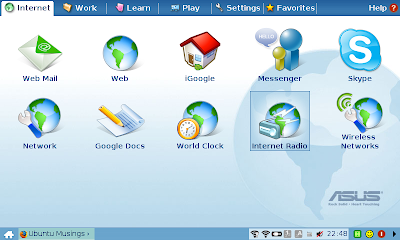
The second screenshot shows the difference between Anshuls older version 1 script and now his latest which I used which is Version 2.2. Notice how I changed the Desktop icons and how the taskbars look now between the two different versions and screenshots. I think Anshuls (thanks man) script is the bomb!

Update: Anshuls site has moved.

Update: He has another new site also

Thursday, July 30, 2009

Install AntiX 8.2 Final on External Flash Drive

Following this tutorial without backing up your data is done at your own risk.

I own a Asus EEE 900. It is a Celeron M, clocked at 900hz,1 gig ram, with a 4gig and a 16 gig internal SSD with Xandros as the stock operating system. I wanted to keep my Xandros on here as I have customized Xandros using the EEE PC Wiki .

So I bought me a 8 gig SDHC Flash Drive. Formated it with Gparted . I formatted the whole 8 gig flash drive as a Primary EXT 2 Partition with no swap partition. I then Downloaded Antix 8.2 and took out my Kingston 2 gig USB drive I have and used it to make a bootable USB using Unetbootin. By the way, You can use a smaller flash drive like a 1 gig or even a 512 mb to make your bootable flash drive. Though on the 512 mb one, I haven't tried it so if someone does use one. Let us know.

Ok, Now my 8 gig flash drive is installed into the r/h slot on Net book. I insert my 2 gig Bootable USB drive and Power up my Asus being sure to hit escape while booting so I can get into the boot order to select the live USB as first boot.

Press Space Bar as Antix Boots up. Now on to the Install. On your install the drives may be different designations than mine. So pay attention to which drive is which. I used Gparted and wrote down the drive letters for all my drives. Because with 2 internal, and 2 external drives. It is easy to get confused. So I recommend a pencil and a piece of paper.


Press AntiX Installer off of Menu Selection.


Agree to the terms and Hit Next


Now I open Gparted again during the install process so I can flag my Hard drive as Boot. I also Label my Hard drive as root "/".


I check every thing when done. Everything Looks in order. Notice that my 8 gig Flash drive is described as sdc1. This is important to remember as we go through the install. Remember or write on a piece of paper the drive letters. You will need them later.


Now close Gparted and we are back to the installer. Remember SDC? That is where I want AntiX to install to. So on Line 1a. I select sdc using the arrow next to where it says sda. I also select custom install on existing Partitions.


I hit next. This brings me to the next page. I make sure I click the box that says "Preserve data in /home if upgrading" so that my ext2 file system won't be reformatted as EXT3 (special thanks to ICE-M in AntiX forums for this tip). I make sure sdc1 is still the destination drive also.Disregard the ext3 tab window as clicking the box preserve data in /home if upgrading nullifies that.
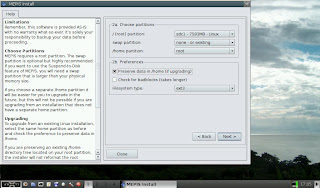


Hit next and Antix installer is nice enough to give you one final warning and let you know exactly where it is going to install to and also that you do not wish to format either. Once you say OK and hit next. You will be off to the races. If you say no you can start over. Nice feature I think.
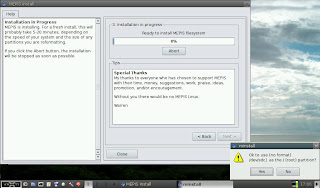


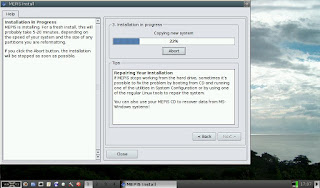
Now kick back and relax. Takes just a few minutes to install Depending on your rig.


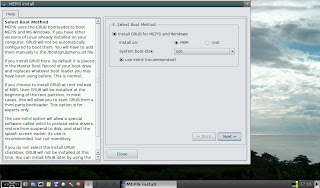
Now to install grub. I make sure I have sdc selected as boot disk and tell it to install to MBR.


Hit Next. Wait for the Grub installed OK message.
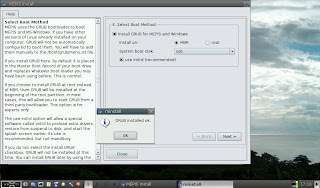


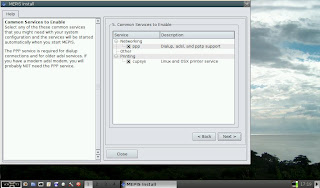
Hit OK. On to the next Page. I accept defaults and hit next.


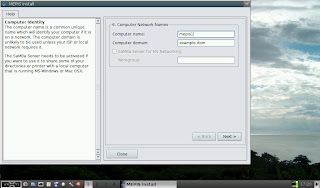
Next page type in Computer Name and domain.


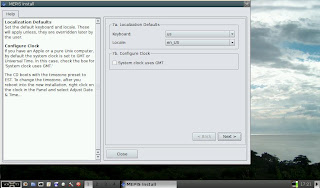
Next page sets up Keyboard and locale config.


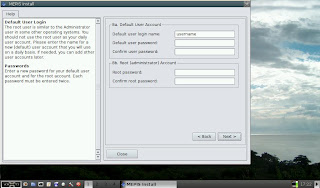
Next page you set up user name and password and root password.


Next page is the finish line. When you hit finish. You may get a error, about naming the user directory. I just click OK and Hit finish again.
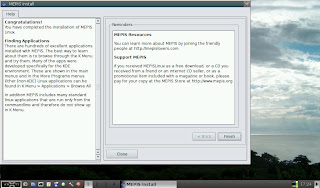


Now you get a pop up asking if you wish to continue running the Live USB/CD or reboot into the operating system. I chose not to reboot yet because I wished to shutdown completely so I could remove my Live USB Drive without hurrying.

I power up again after removing USB Drive. I make sure I hit escape to bring up my boot menu again in bios. I select my 8 gig flash drive as first boot. Every time I wish to boot up AntiX as a dual boot with Xandros, I will have to use escape button to select external 8 gig flash drive in the boot order to boot up AntiX. If I don't, it will just default to booting up Xandros. I am Welcomed with the AntiX Grub Screen. It is quite attractive. I select the top Menu item. AntiX boots. I get a grub error 15. I think in my unprofessional opinion that with 2 internal drives,and one 2 gig external USB,and 1 external 8 gig SDHC Flash card. That grub menu.lst got confused as to which drive was the boot drive for Antix. I have heard from a friend this happens with a Fedora 11 install to a external flash drive also.

I press any key to continue. Next I press the "e" key to get me to edit the grub entry for booting root. I press e again on the next page. I change the root entry (hd2,0) to (hd0,0), I press enter. Then I press the letter "b" so I can boot. Antix 8.2 Final is now booting up. I press the space bar again to continue with the booting process.

After I get to my Desktop I open Terminal. Now I used su to become root user. I typed in su without thinking. Actually you should type in sux in AntiX to become root user. But su worked for me.Hit enter. I type in my password and hit enter. I type in
leafpad /boot/grub/menu.lst
and hit enter.


That opens up my /boot/grub/menu.lst with leafpad editor so I can now edit it to boot up AntiX properly.


I proceed to edit /boot/grub/menu.lst. I like a longer default time so I change it from 15 to 30 seconds. I edit both root entries in grubs menu so I can boot up AntiX and Xandros even If I boot from AntiX Grub screen. I change the Antix at sdc1 root entry from (hd2,0) to (hd0,0). I change my Normal Boot (which is actually Xandos) root entry from (hd0,0) to (hd1,0). My /boot/grub/menu.lst now looks like the screen shot below


Here is a complete screen screenshot of what my new AntiX 8.2 /boot/grub/menu.lst looks like. I only showed the smaller window on previous screen shots because I didn't need the whole window maximized to make the changes I needed to make.


I go to close the window when done and say yes to saving my changes.


Now all that is left is to connect to the net. I open Control Panel>Network>Connect Wireless.
I first go to preferences (on top task bar) and ( scroll though tabs in preferences till I find dhclient with a empty check box) and use dhclient to connect. You need to check that box to connect. At least I had to to connect completely. I then hit the connect button to connect up wireless and check the box for automatically connect to this network.


I then test my wireless


This is how I installed AntiX 8.2 to a 8 gig SDHC External Flash Drive. This worked for me. I prefer AntiX 8.2 instead of Easy Peasy or EEEbuntu because Of the speed at which it runs on the flash drive. Both Ubuntus don't require editing the /boot/grub/menu.lst if you decide to use either of those distros following this tutorial. I just prefer AntiX. Special thanks goes to Anticapitalista and all the members at AntiX Forum who held my hand and gave me help when asked for. Thanks guys.

One last hint or note. If You boot into Xandros with the flash card drive still plugged in and it gives you the pop up window for your flash drive to open it in File Manager. Just close it first. Then Unmount your Flash Drive using the icon from your bottom Task bar. The reason I mention this, is because the next time you boot up the flash drive into AntiX or whatever you install to flash drive. The boot loader will complain that you didn't unmount the external flash drive cleanly. It will then do a disk check for errors and then reboot again. So if you want to leave the external flash drive in its slot. Make sure you unmount it before you do anything else in Xandros. You might forget later when you go to shutdown. Just a small tip.

Update Sept11, 2009

To fix undefined Video mode at boot up I opened up as root /boot/grub/menu.lst and edited vga=791 to vga=785

This line in menu.lst is what I am refering to. You can use leafpad as root to edit it like I showed in above instructions.

kernel /boot/vmlinuz-2.6.27-1-mepis-smp root=/dev/sdc1 nomce quiet nosplash vga=785

Friday, April 24, 2009

How to install Easy Peasy in Acer Aspire One


I 've been using Acer Aspire One for the last month and while I really like its GUI, which made it easy to use like a cell-phone, the pre-installed Linpus Lite is well...Lite...
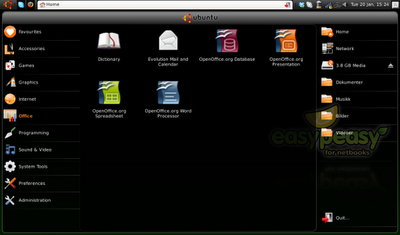
So I decided to install Ubuntu 8.10. But the conventional GUI of any OS, whether it is Ubuntu, Fedora or Windows is not well fitted to 9" screens. So my options where to install the "Easy Peasy" version of Ubuntu (Formerly Ubuntu Eee) or to install the interface of HP Mini. As you already guessed from the article title, I installed Easy Peasy!!!


First download Easy Peasy and burn the image to a CD(if you have a USB Cd-Rom) or creat a Live-USB, using UNetbootin.
Unetbootin is a great tool that creates a Live-USB, using an ISO file of any Linux distribution. It works on Linux and Windows. It really can't get any better!!

Then press F12 while booting to invoke the boot menu and choose the USB.
It will take a while to boot from the USB, since netbooks are not very fast, but once installed it doesn't take too long to boot(and the next version of Ubuntu & Easy Peasy will boot much faster, especially if you choose to use the EXT4 filesystem).

Easy Peasy will immediately present you the Ubuntu installer. If you want to try it first, to make sure everything works OK, just close the installer. After trying it for 2 hours I concluded that wifi & ethernet work OK, sound and videos OK, camera (using the cheese program) worked OK as well. In 2 words, everything worked out of the box!! Try installing Windows, entering the 25-digit password, going through the activation procedure, install drivers for everything (motherboard, wifi) codecs, firefox, skype, MSN or Pidgin, OpenOffice or MS-Office, antivirus, anti-spyware, anti-trojan, anti-everything and tell us how many hours it took you!!

Enough ranting, let's get back to business...
The installation procedure is exactly the same as for Ubuntu. Select Language, time zone, keyboard layout, partitions, username & password and that's it.
One important point is to use a non-journaling filesystem, because journaling is accussed of reducing the life of SSD drives. If your model has the classic hard disk, than select EXT3 (or EXT4 in the next version 9.04 of Ubuntu, to get better boot times). If your model has SSD, than select EXT2 filesystem.
Apart from the EXT2 filesystem for the / partition, keep the swap partition as it is.

When the installation finishes, remove the USB and reboot. If you are connected to the Internet, you will be notified that there are updates available. These will probably be more than 150 and will take about 1 hour to be downloaded installed, but it is an easy 1click procedure.

If you prefer Thunderbird to Evolution, you can install it through Synaptic(in the Administration section) or from the terminal
sudo apt-get install thunderbird
I aldso installed vlc, although Easy Peasy has codecs for everything. Installation is the same as for Thunderbird.

It can't be that good, it just can't!!!! What's the catch???
If you can call it a catch, Ubuntu 9.04 was released in April 23rd, so you will either have to do a clean install or do an Internet update, which will take a LOT of time in a netbook and I can't recommend it. So you'll need to backup your /home folder, before the upgrade. Or you can wait for the next version of Easy Peasy that will be based on Ubuntu 9.04. Although Easy Peasy may stop being developed, since Jaunty has an official Netbook Version. I'll try it and post again in the next few days.

There is a minor bug, that you can fix within 30sec. The installer coming up every time you reboot after Easy Peasy is installed. Simply go to
->Preferences
->Sessions
and disable Ubiquity

Sunday, September 14, 2008

How to install programs in Acer Aspire One


I strongly suggest to give Ubuntu Easy Peasy a try. Installation is really easy, everything works out of the box, it comes with everything you need (codecs, programs) and installing new programs is VERY easy, without the limitations of Linpus Lite.


Follow the next simple steps to add programs to Acer Aspire One:
  1. press alt+f2 or go to Files->My Documents to open the File Manager and then go to File->Terminal.


  2. In the terminal type: xfce-setting-show
  3. Click Desktop, then go to Behaviour tab
  4. Enable "Show desktop menu on right click"
  5. Right clicking on the desktop will now give you more options.
  6. Click System-> Add/Remove Software
  7. Give your password
You will see the available software and can choose to install anything that is on that list. You must be connected to the Internet, so it can download the programs and install them for you. Have fun!


If it asks for root password you can set it the following way:
Go to Files->My Documents to open the File Manager and then go to File->Terminal.

To change root password, first you must become root:
sudo su

and change the password with the command:
passwd

When you type this command nothing will appear as you type your password. No ******* and the cursor won't move either.


I strongly suggest to give Ubuntu Easy Peasy a try. Installation is really easy, everything works out of the box, it comes with everything you need (codecs, programs) and installing new programs is VERY easy, without the limitations of Linpus Lite.


Friday, September 12, 2008

Yet Another "eeePC rocks" Post

One year ago, i decided to buy a small laptop, to carry with me in my travels. It was the dawn of netbooks, so my options where these: Asus EeepC and EeePC surf!
I did not chose the "surf" Edition, as it had smaller solid-state disk(2gb instead of 4) and no camera. The processor was also clocked lower and the price difference only 30 euros(42$).

Manufacturing Quality:
Being manufactured by Asus, one of the best hardware vendors in motherboards and video cards, i expected nothing less than top quality. It turned out i was right.
It weights 2 pounds (1 kg).


Operating System/Ease of Use:
EeePC comes preloaded with a specially modified version of Xandros Linux.
Being Linux it has the well known advantages of being fast, safe, rock solid and free. Xandros modified its OS to be usable in screens as small as 7" with the famous tabbed interface, which is now also used by Acer Aspire One.


What amazed me was not how easier it was than most Linux distributions bask then. It was much easier than Windows! It had an icon for the internet, for email and for the wireless connection, pretty much the straightforward design you would expect from a cell phone. I clicked the wireless icon and a window with available networks opened. I selected one of the free ones and it connected with the first attempt i ever made on wifi. I also tried a Huawei E170 3G usb and it did not ask me for drivers. No need for drivers, no configuration(for the wifi, 3G needed username/pin), NOTHING TO WORRY ABOUT.
Preinstalled software was Firefox, Openoffice, Thunderbird, Amarok and a video player. It also had antivirus installed, although it does not need it(It serves more to protect windows users from infected files that can't harm Linux)

Speed:
EeePc owes its speed not only to Linux, but to the solid-state drive as well. It booted and opened openoffice faster than my Core Duo laptop! Moreover, thanks to the solid-state disk, which has no moving parts, the battery lasts longer and it is more resistant to falls.

Conclusion:

Asus EeePC had some remarkable accomplishments:
  1. It created a whole new category, the netbooks and was soon followed by HP 2133, Acer Aspire One, MSI Wind and now Dell Mini 9.
  2. It forced Microsoft to keep selling XP(where the 200.000 signature petition failed), as netbooks don't have the horsepower Vista needs compared to Linux and XP.
  3. It made Linux mainstream. 2007-2008 was probably the long sought Year Of Desktop Linux . (well, Netbook to be precise!)
To conclude, EeePC was a great buy, as it provides the best user experience till now and it is easy to carry, when you are on the move.
Let Linux haters shout as much as they like! EeePC is an amazing success story.