Showing posts with label tutorials. Show all posts

Monday, January 24, 2011

Pianobar Linux

Pandora radio can be a resource hog when playing in your browser with all the flash stuff going on. Pianobar is a

pianobar is a console client for the personalized web radio pandora
(http://www.pandora.com).

- play and manage (create, add more music, delete, rename, ...) your stations
- rate played songs and let pandora explain why they have been selected
- show upcoming songs/song history
- configure keybindings
- last.fm scrobbling support (external application)
- proxy support for listeners outside the USA


Basically. You can put your headphones on and listen to pandora radio through a terminal without opening a browser while working on other things like office work, pictures, whatever. You can also listen while surfing the web without opening pandoras site. You will need a pandora radio account and set up some radio stations before installing pianobar.

Debian and Ubuntu should have it in their package managers. Just be sure to hit the reload button in the package manager before doing a search for pianobar. For Puppy Linux. I have successfully installed and ran this in Puppy Linux 5.1.1 and Puppy 5.2. For Puppy Linux. I got the installable pet package from Here. This is what it looks like running in Puppy Linux on my IBM A22m. I run this in AntiX also. Hmmmm. I might have found one for you Windows users also. No guarantees though. Found THIS also for Ubuntu.


Another New Player worth checking out is Foobnix

Friday, April 9, 2010

INXI Yes you can install it in Ubuntu

I showed you how it could be installed in Puppy Linux.

So I decided. Lets see if this works in ubuntu. So I booted up my Ubuntu 8.04 LTS Desktop. And proceeded to install.

First I went back to the site

Then proceeded to install page

I used the below command to download the deb package to my /home folder


So I issue the command to download

sudo wget ftp://cathbard.com/binary/inxi*.deb


Wait till it downloads my deb package to /home. I go to places on my taskbar and select home to open. I look and find my inxi_1.3.2-1_all.deb.

Now it is just double left click on inxi_1.3.2-1_all.deb and let Gdebi do its thing.

After installing. Open Terminal and upgrade inxi first by doing a

sudo inxi -U


After it upgrades to inxi 1.4.8 you can run inxi -F to look at your system specs.


I like having extra commands in terminal that I never had before. It makes my box more functional. Happy Trails, Rok

Monday, March 29, 2010

AntiX 8.5 Persistent Flash Drive.

This how to is just going to be a generic how to for making a persistent live usb of AntiX. You can do this on any computer. You can do this with a Live CD or Live USB or Live SD. For my purposes. I am doing this using a live USB. But a Live cd will work just as good for this also. Your downloaded iso I will show you later will work running in live cd mode also. So it does not matter if you are using a Live CD or Live USB or SD card. My persistent live drive I am going to install to is going to be a Kingston 4gig SD Flash card.

You should know. That any changes you make to a persistent install usb. Like if you install xfce Desktop of KDE Desktop or Gnome Desktop to your live persistent USB Drive. If you run the installer on that USB Persistent Drive. It will install ALL Changes like your XFCE,GNOME,or KDE Desktop also.

The Meta installer which is on the menu is a great tool for installing different Desktops and other stuff.

I am going to show how doing this with the AntiX 8.5 base ISO. For first time users I would suggest you download the AntiX 8.5 Full Iso.

I will mention this though. If you are a EEEPC user reading this. If you do the base Install and Ceni when you open it runs the cpu at 100% when loading Ceni. Just wait till Ceni finishes loading and CPU will drop back down to 15%. I experienced this on my EEEPC 900 (celeron processor). I also used a land line for all my downloads and after booting up base Persist SD Card. I used a land line also running base to install packages using

apt-get update


In terminal as root user and then

apt-get install wicd


So as to bypass using ceni to connect wireless. Do what you wish though. I am just mentioning this from personal experience.

Just think of AntiX base as a Debian Net minimal install that you can build off of.
AntiX Full Iso has more tools though Like AntiX control center and Synaptic package manager. The base just comes with apt-get. Full Iso comes with ceni, wicd, rutilt to connect to the net. Base come with just ceni.

Antix has a New Wiki thanks to all the hard work by the Antix group. Check it out also.

Antix Wiki How To articles


You will need to make a Live Media of AntiX 8.5 first (cd or usb or SD card). Whichever way you prefer. My way is just one of the many ways it can be done.

Refer to my old post on AntiX 8.2 and Unetbootin if you wish to make a live USB my way.
Link

Inset your media that you wish to boot live session from. Insert at least a 1 gig Flash drive (what I would call a minimum size USB for a persistent USB of AntiX. 2 gig or higher would be better.)

Ok. Now use whatever key you need to use to change boot order in bios. And change boot first to USB or cdrom. Depends on what your bios is capable of and what media drive you are going to use.


You should be greeted with with a grub splash screen. Pick the top Option. You will not need to login. You should be greeted with a Icewm Desktop. Make sure you are connected to the net. We will need to download a ISO and Md5sum text from the net. Open your Browser and go to AntiX main web page. I used This Mirror since I live in the US. Choose any mirror you wish from the list though. Remember You can use any of the isos on that list. 8.2 Full, 8.2 base, 8.5 Full, Etc.... Any AntiX iso will work with the antix2usb persistent installer.

{I wonder if any other Linux Distro like Full Mepis 8.5 will work with the persistent installer. Time and testers will Tell)


You can download isos to your live USB session. Just remember that if you reboot or shutdown. You will lose any isos downloaded after reboot. Download will take a few minutes. You have time to do other things while this is going on.


You should now have 2 files in your Download folder in AntiX. Now I am going to do a md5sum check of my Iso to make sure the file is OK. You should always do a md5sum check of large files (IMO) to save your self time and grief later if something does not go right.

Go to where you downloaded AntiX ISO and Md5sum. On mine I have it in /home/demo/downloads.
Right click on empty space in file manager. You should see a menu. Pick open in terminal. I am using pcmanfm file manager to show this. It is the default file manager in AntiX live though rox is available also. For simplicities sake. I will show this using the default file manager.


Next you will get a pop up. Terminal program not set. No worries. Just hit the oK button.


Next the preferences window will pop up and you can select which terminal you wish to run in file manager. For my purposes. I will pick rox-terminal. Just use the drop down arrow on the blank box in preferences to do this.


Close preferences window after selecting your preferred terminal. Right click on empty space where you have your isos and your terminal should now open. I used rox-terminal as a example so I could show you how to copy and paste md5sum readout into your downloaded md5sum text file to compare the two.


Double left click on your md5sum text file next to your iso file and paste terminal readout under your entry in text file.


As you can see. My md5sum check OK. So I can close pcmanfm because I am done and start on the SD card Install process. A USB drive will work just as well.

Go to the crossed wrenches on the bottom task bar and open up AntiX control Center and left click on the disks tab. You will see antix2usb button on the bottom right of window.


Left click on the antix2usb button and the next window that pops up will show the installer. On the top Select Iso file find your downloaded Iso and put it in that window.

On device find your drive you are going to do the persist install to and put it in that window.

Make sure the drive you are installing persistence to is unmounted. You can unmount it by either opening pcmanfm as root.

gksu pcmanfm


or follow steps using steps from the wiki

You can use the livecd/liveusb/fromiso live (as well as installed antiX) to install an antiX.iso file to usb stick via the antix2usb application.

1. Boot from live media

2. Open antiXcc -> Disks -> antix2usb, provide root password

3. Select Iso file - Navigate to the antiX.iso file

4. Choose a system partition size of circa 10 MB bigger than the selected Iso file

5. Set options for antix2usb ie persistent.

6. Make sure hal is disabled before hitting Apply (/etc/init.d/hal stop)

7. Once finished, you should have a bootable live usb stick with persistence enabled

8. If you have an older computer, you might need to add this to the /boot/grub/menu.lst to stop being dropped to a limited shell, when booting from the usb stick.

rootdelay=10


It was just easier for me to unmount SD drive using pcmanfm as root user. There are many ways to unmount a drive in AntiX. My way is just one way to do it.

Mine looks like this screenshot when done.


I am using ext2 file system. I am also using the default 320mb since I am using Base Iso for this tutorial. If using Full Iso the value will be a little larger. Closer to 600 mb or so. The default sets the demo (live Partition) 10% higher than it needs to be. So default is fine in most cases. If your drive is huge like 8gig or so. You can type in that box a larger value if you so wish. Just remember you are going to be taking away space from the persistent partition when you do this. If you hit the drop down arrow. Other file systems are available like ext3 and ext4. Use what you wish. Notice that I have the persistence box checked also. Everything from here on will be done Auto Magically. Hit the Apply Button.


Be patient. Give it some time. If you get a pop up window saying the install drive is mounted. Then you haven't unmounted the drive yet. Just unmount that drive and hit the apply button again after closing error window.

Window below should show up if you did every thing right.


Just Shut down and pull your Live CD, Or USB. Keep the persistent live in your computer. Use bios to boot from that drive. Enjoy your new Persistent Live media on your computer. My persistent flash drive using fluxbox (default window manager for base) with rox desktop icons (with a couple of new apps installed)


Thanks again to the gang at AntiX. Just to mention a few. (Not in order of importance. Just great guys involved in this). Special thanks to lagopus for this useful tool.

lagopus
miks
m_pav
anticapitalista
BitJam
secipolla
ICE-M
eriefisher
SilverBear
OldHogsHead
And a ton of others.It is a community of Linux brothers.

Sorry if I missed anybody. You should really check out the Antix2usb installer. It is one neat tool to have. I am going to leave this last link just because I like it. It mentions the 2 operating systems I chose to run on some of my gear.

Best NewLinux Operating Systems you may not know about for 2010


Since doing this install. I have installed XFCE Desktop and wicd network manager. I use this drive on My Acer Aspire One ZG5 with Atheros Wireless Chipset with the Ath5K Linux driver that comes stock in AntiXs kernel. wlan1 is the wicd network manager interface to get connected in wicd properties. I use dhclient also instead of Automatic in wicd preferences also.

Friday, March 12, 2010

Install inxi in MacPup

I haven't posted in a while. I had some Surgeries to deal with. Any Hows. I run Macpup Foxy 3 on one of my Laptops. A IBM T23. I dual boot it with AntiX. Antix has a nice command in terminal called inxi besides a few others. Today I am going to show you how to install inxi in MacPup. This should work for other distros also. But I haven't tried it yet. So do at your own risk/experiment.


If you are interested in MacPup. I recommend the below video to get a idea on what it uses and is.

You Tube Video


First I went to This Site

I Opened my Terminal. In Puppy you are always root user in terminal. So no need for su or sudo. For you sudo users. Use sudo or su before the below command.

cd /usr/local/bin && wget -Nc smxi.org/inxi && chmod +x inxi


I have already installed inxi so I won't run the command again. Just hit enter and you will have wget download and install inxi into your Operating System. Like I said. I used MacPup Foxy 3 for this install.

After it is done downloading and is installed. I closed Terminal to be on the safe side and reopened it before running inxi Command. This might not be necessary.


This post was done on a IBM T23 Laptop that boots AntiX 8.5rc3, AntiX 8.2, Macpup Foxy 3, and Puppy 4.31. Happy Trails, Rok

Edit: since I have posted this. I have installed this on Puppy linux 4.31, Puppy Dingo 4, NOP Puppy Linux, Bruno Puppy Linux, Lighthouse Puppy linux. This script works on all those variations of Puppy Linux I have tested this on.

Monday, August 24, 2009

Pimp your GIMP!!

You already know GIMP, as it comes pre-installed with half Linux distributions or you may use it in Windows. It has a ton of features but it doesn't come with many brushes to boost your creativity even further. No problem! You can simply add brushes made by professional artists very easily and for free. Some great sites are Qbrushes.com, Brusheseezy, PSbrushes, deviantART GIMP brushes, deviantART PS brushes..

-What?? It says "Quality brushes for Photoshop"!

That is not an issue as GIMP can use Photoshop bruses. Simply download any brush you like, uncompress it and copy it to /home/username/.gimp-2.6 (this will vary according to username and version). Next time you launch GIMP, you can select your new brushes and make great designs.

(A few of Qbrushes)


While I was adding brushes, GIMP refused to start. A brush set was the issue, so I deleted it and GIMP continued to work fine. The other 10 brush sets I downloaded, worked with no issues.

Thursday, July 30, 2009

Install AntiX 8.2 Final on External Flash Drive

Following this tutorial without backing up your data is done at your own risk.

I own a Asus EEE 900. It is a Celeron M, clocked at 900hz,1 gig ram, with a 4gig and a 16 gig internal SSD with Xandros as the stock operating system. I wanted to keep my Xandros on here as I have customized Xandros using the EEE PC Wiki .

So I bought me a 8 gig SDHC Flash Drive. Formated it with Gparted . I formatted the whole 8 gig flash drive as a Primary EXT 2 Partition with no swap partition. I then Downloaded Antix 8.2 and took out my Kingston 2 gig USB drive I have and used it to make a bootable USB using Unetbootin. By the way, You can use a smaller flash drive like a 1 gig or even a 512 mb to make your bootable flash drive. Though on the 512 mb one, I haven't tried it so if someone does use one. Let us know.

Ok, Now my 8 gig flash drive is installed into the r/h slot on Net book. I insert my 2 gig Bootable USB drive and Power up my Asus being sure to hit escape while booting so I can get into the boot order to select the live USB as first boot.

Press Space Bar as Antix Boots up. Now on to the Install. On your install the drives may be different designations than mine. So pay attention to which drive is which. I used Gparted and wrote down the drive letters for all my drives. Because with 2 internal, and 2 external drives. It is easy to get confused. So I recommend a pencil and a piece of paper.


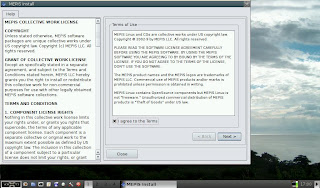
Press AntiX Installer off of Menu Selection.


Agree to the terms and Hit Next


Now I open Gparted again during the install process so I can flag my Hard drive as Boot. I also Label my Hard drive as root "/".


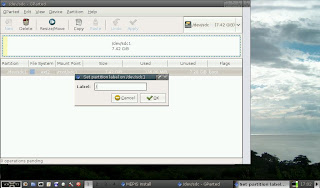
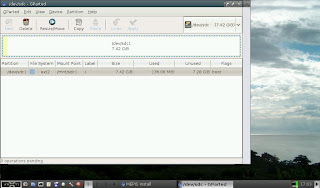
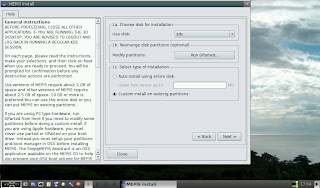
I check every thing when done. Everything Looks in order. Notice that my 8 gig Flash drive is described as sdc1. This is important to remember as we go through the install. Remember or write on a piece of paper the drive letters. You will need them later.


Now close Gparted and we are back to the installer. Remember SDC? That is where I want AntiX to install to. So on Line 1a. I select sdc using the arrow next to where it says sda. I also select custom install on existing Partitions.


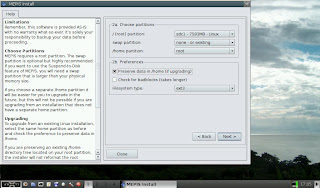
I hit next. This brings me to the next page. I make sure I click the box that says "Preserve data in /home if upgrading" so that my ext2 file system won't be reformatted as EXT3 (special thanks to ICE-M in AntiX forums for this tip). I make sure sdc1 is still the destination drive also.Disregard the ext3 tab window as clicking the box preserve data in /home if upgrading nullifies that.


Hit next and Antix installer is nice enough to give you one final warning and let you know exactly where it is going to install to and also that you do not wish to format either. Once you say OK and hit next. You will be off to the races. If you say no you can start over. Nice feature I think.


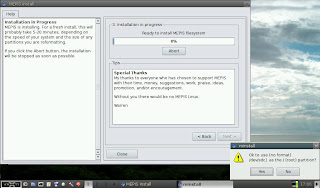
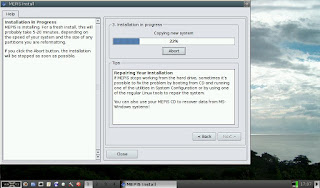
Now kick back and relax. Takes just a few minutes to install Depending on your rig.


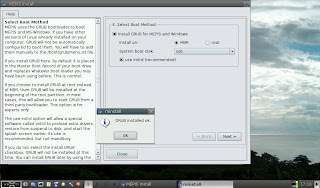
Now to install grub. I make sure I have sdc selected as boot disk and tell it to install to MBR.


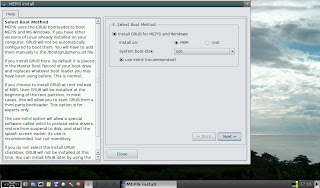
Hit Next. Wait for the Grub installed OK message.


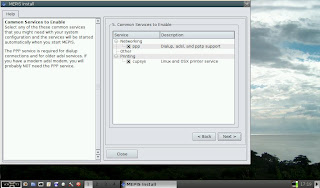
Hit OK. On to the next Page. I accept defaults and hit next.


Next page type in Computer Name and domain.


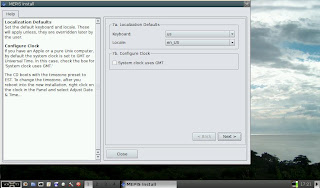
Next page sets up Keyboard and locale config.


Next page you set up user name and password and root password.


Next page is the finish line. When you hit finish. You may get a error, about naming the user directory. I just click OK and Hit finish again.


Now you get a pop up asking if you wish to continue running the Live USB/CD or reboot into the operating system. I chose not to reboot yet because I wished to shutdown completely so I could remove my Live USB Drive without hurrying.

I power up again after removing USB Drive. I make sure I hit escape to bring up my boot menu again in bios. I select my 8 gig flash drive as first boot. Every time I wish to boot up AntiX as a dual boot with Xandros, I will have to use escape button to select external 8 gig flash drive in the boot order to boot up AntiX. If I don't, it will just default to booting up Xandros. I am Welcomed with the AntiX Grub Screen. It is quite attractive. I select the top Menu item. AntiX boots. I get a grub error 15. I think in my unprofessional opinion that with 2 internal drives,and one 2 gig external USB,and 1 external 8 gig SDHC Flash card. That grub menu.lst got confused as to which drive was the boot drive for Antix. I have heard from a friend this happens with a Fedora 11 install to a external flash drive also.

I press any key to continue. Next I press the "e" key to get me to edit the grub entry for booting root. I press e again on the next page. I change the root entry (hd2,0) to (hd0,0), I press enter. Then I press the letter "b" so I can boot. Antix 8.2 Final is now booting up. I press the space bar again to continue with the booting process.

After I get to my Desktop I open Terminal. Now I used su to become root user. I typed in su without thinking. Actually you should type in sux in AntiX to become root user. But su worked for me.Hit enter. I type in my password and hit enter. I type in
leafpad /boot/grub/menu.lst
and hit enter.


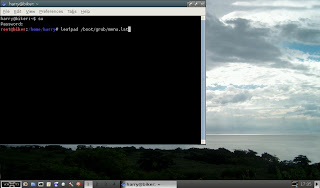
That opens up my /boot/grub/menu.lst with leafpad editor so I can now edit it to boot up AntiX properly.


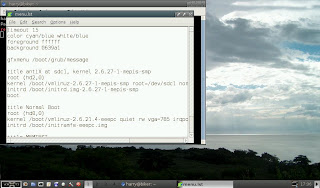
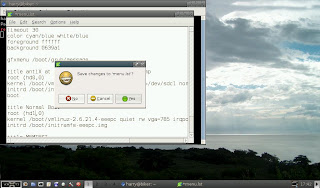
I proceed to edit /boot/grub/menu.lst. I like a longer default time so I change it from 15 to 30 seconds. I edit both root entries in grubs menu so I can boot up AntiX and Xandros even If I boot from AntiX Grub screen. I change the Antix at sdc1 root entry from (hd2,0) to (hd0,0). I change my Normal Boot (which is actually Xandos) root entry from (hd0,0) to (hd1,0). My /boot/grub/menu.lst now looks like the screen shot below


Here is a complete screen screenshot of what my new AntiX 8.2 /boot/grub/menu.lst looks like. I only showed the smaller window on previous screen shots because I didn't need the whole window maximized to make the changes I needed to make.


I go to close the window when done and say yes to saving my changes.


Now all that is left is to connect to the net. I open Control Panel>Network>Connect Wireless.
I first go to preferences (on top task bar) and ( scroll though tabs in preferences till I find dhclient with a empty check box) and use dhclient to connect. You need to check that box to connect. At least I had to to connect completely. I then hit the connect button to connect up wireless and check the box for automatically connect to this network.


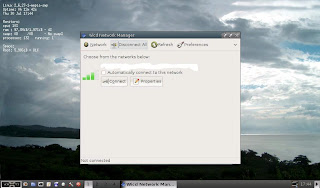
I then test my wireless


This is how I installed AntiX 8.2 to a 8 gig SDHC External Flash Drive. This worked for me. I prefer AntiX 8.2 instead of Easy Peasy or EEEbuntu because Of the speed at which it runs on the flash drive. Both Ubuntus don't require editing the /boot/grub/menu.lst if you decide to use either of those distros following this tutorial. I just prefer AntiX. Special thanks goes to Anticapitalista and all the members at AntiX Forum who held my hand and gave me help when asked for. Thanks guys.

One last hint or note. If You boot into Xandros with the flash card drive still plugged in and it gives you the pop up window for your flash drive to open it in File Manager. Just close it first. Then Unmount your Flash Drive using the icon from your bottom Task bar. The reason I mention this, is because the next time you boot up the flash drive into AntiX or whatever you install to flash drive. The boot loader will complain that you didn't unmount the external flash drive cleanly. It will then do a disk check for errors and then reboot again. So if you want to leave the external flash drive in its slot. Make sure you unmount it before you do anything else in Xandros. You might forget later when you go to shutdown. Just a small tip.

Update Sept11, 2009

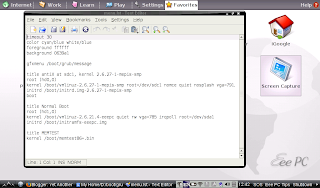
To fix undefined Video mode at boot up I opened up as root /boot/grub/menu.lst and edited vga=791 to vga=785

This line in menu.lst is what I am refering to. You can use leafpad as root to edit it like I showed in above instructions.

kernel /boot/vmlinuz-2.6.27-1-mepis-smp root=/dev/sdc1 nomce quiet nosplash vga=785

Thursday, April 30, 2009

Sound Converter

Sound Converter is a gnome sound conversion available for Linux. You can convert music files into another format (OOG, MP3 and Flac). The tool is very simple, just add the files, set the destination directory and convert the files.

The how to with pictures is here:
http://taufanlubis.wordpress.com/2008/05/14/sound-converter-%E2%80%...

Here is a more detailed How to from me.

Insert CD, The window below should open up. Click on Copy to Library


Disregard the time in the lower window. It doesn't take that long on my rig. More like 10 to 15 minutes.
Open up home folder then music folder and you should have a folder like mine (though the one I'm doing is Tom Petty)


Now I'm going to create a Folder named Tom Petty 2 in harry/home


I wanna show you where sound converter now is.


Now select open file


Find your Music folder, Double left click it. Keep double clicking till you get to the listing of music you wish to convert.


Now click on edit and use select all. This will highlight all the songs you wish to copy off album. You can delete any songs later when you are done in its new folder (Tom Petty 2), Or you can select just individual songs to convert. Next hit the open button and your window should look like this below.


Now go to preferences. I make sure that destination folder is Tom Petty 2 by using the Choose button. I am converting my music from oog to mp3 if you look at the picture


Now just hit the Convert Button and you are off to the races. Not bad for a Tattoed knuckle dragging Biker who hated computers. If I can do it. Anybody can. Happy trails Guys and Gals